EdTech 513: E-Learning Strategies for F2F Classrooms

As a high school marketing teacher, there are many ways that I can utilize technology in the classroom, however, I would specifically like to incorporate more e-learning strategies for the Advanced Marketing course that I teach. Currently, the students are assigned to complete business/marketing article reviews with current events. They read the article and write up a summary, include key marketing terms that are mentioned, discuss the seven functions of marketing that are displayed, and reflect on how they will use the information for future jobs or business opportunities.

In order to incorporate e-learning strategies and activities in my advanced marketing class, I would like the article reviews to become more collaborative. Students will still read business/marketing related articles, but instead of writing the article reviews and turning them in, they can post them on their own blog site, such as EduBlogs. Students in the class will then be assigned to read three of their classmates’ article reviews and post comments with feedback and questions for the student that wrote the post. This will allow for a more reflective practice, interactive learning, and better exposure to what is currently happening in the business world. In addition to the collaboration, it will allow for submission of the assignment online, rather than on paper, which will invite instructor feedback.

Although this sounds like a simple implementation in a high school course, there are still challenges that could arise. One challenge would be teaching high school students to navigate and use EduBlogs. This would be new to many students, so I would need to make sure to thoroughly explain how to go about creating posts, how to reply to others, what is expected in each post, how to collaborate, etc.

Another challenge would be monitoring collaborations to make sure that students are following proper netiquette in what they are posting and commenting. EduBlog is a great blog site to do this, because the features allows the instructor to preview comments before they are posted. In addition, students would need be taught how to properly respond and respectfully disagree online.

A final challenge of implementing blog posts for article reviews would be assisting the students that can become easily distracted online. When using laptops and having the freedom to search for articles, students tend to wander to other websites, games, etc. A way to overcome this challenge would be to make sure that I am not only monitoring them as they work, but also setting deadlines for posts, and comments to classmates. Since this is a junior/senior level class, I think it is also important to communicate the expectations and hold them to a high standard. As business/marketing students, they are going to soon be out on their own in the business world, and need to learn how to be self-sufficient and responsible.

I think that incorporating this e-learning strategy into my advanced marketing class will have numerous benefits. Not only will it allow for students to continue to learn about current business/marketing happenings in the real world and apply their marketing knowledge, but they will also be able to collaborate with their classmates by reading their articles as well. This will broaden the students’ marketing knowledge, encourage them to interact with their peers though feedback and reflective practice, and allow the instructor to provide meaningful feedback and guidance. I am looking forward to implement this strategy into my advanced marketing curriculum and I know that this is just one small change that I can make to utilize technology and e-learning in the classroom.
EdTech 541: Final Reflection

Part 1: Course Reflection:

By taking this course I have learned a lot and will leave with numerous resources that I can begin using in my classroom right away! Before this course, I never imaged all the ways that technology could easily be integrated into education. I have learned the foundations of how to effectively integrate technology by using 21st century software, websites, and tools. In addition, I now know that creating cross-curricular lessons is doable and should be done to enhance learning!

Theories that I learned from reading Integrating Educational Technology into Teaching will go beyond the creation of the course assignments. I now have a clear understanding of how to not only incorporate technology into the classroom, but how to do it effectively. This book will be a great resource as I continue to evolve as an educator and look to utilize technology in education. By reading and learning about each module topic prior to the creation of the assignments, I was easily able to apply what was learned and emulate meaningful lessons to engage my students.

The coursework demonstrates the mastery of the AECT standards very well. Prior to each assignment, I read and learned about the theoretical foundations and completed research to learn more about each topic and explore resources. The assignments required me to create authentic work that will be used in my classroom. Content knowledge and relevant pedagogy was applied and allowed us to evaluate ourselves and our classmates as well. Finally, I reflected on my learning and believe this course will make me a better teacher and more thoughtful in how I use technology in the classroom.

I have grown as professional and as a teacher by becoming more mindful of how I used to use technology in the classroom and how I can improve by using the new resources to stay relevant in a digital age. I have realized that I was quite single-minded when it came to technology. I know have numerous resources and ideas that I can utilize in my classroom and am excited to continue to grow and learn about new technologies. The term life long learner has never seemed so relevant! As an educator, I plan to try to incorporate technology more in the classroom when it is relevant and provides meaningful experiences for my students. I really enjoyed this class and look forward to using the knowledge and resources gained from this course!

Part 2: Blog Performance:

For each blog post, I kept the blog grading rubric in mind. I did my best write thoughtful posts, provide connections to my current content area and real life situations. I referred to the course readings, found meaningful resources that related to each topic and provided further insights. I was careful to site all resources accurately in APA format. I tried to post early in the module, but struggled with this at times, combined with completing other assignments, however I never posted late! I received comments on most of my posts and was able to get thoughtful feedback from others. Finally, I always commented on two of my classmates posts, providing meaningful feedback, how it related to similar things that I experience, and asked questions when necessary. Overall, I think I did a nice job on my blog posts. See below for my self-assessment scores:

  • Content: 66/70
  • Readings & Resources: 19/20
  • Timeliness: 17/20
  • Responses to Other Students: 30/30
  • Overall: 132/140

EdTech 513: Project #8: Worked Example Screencast

In order to create this worked example screen cast, I used Camtasia. It worked very well because once I created the PowerPoint, there was an add-in feature available through the program and I was able to record right in PowerPoint! The purpose of this worked example was to teach marketing students how to calculate the costs of a magazine bleed ad. For my worked example, I provided three examples. The first example was completed together, the second was completed through gradual release, and the third required students to do the problem completely on their own. I think it turned out really well!

Some challenges that I faced were the amount of times that I recorded the screen cast to get it just right. Eventually, I ended up writing my presentation script prior to recording, rather than just describing as I went, which worked much better. I enjoyed using Camtasia, but since I used the trial version, the water mark doesn’t look the greatest on my presentation. There are many cool features that could have been added to the presentation, but I chose to keep it simple! See below to view my worked example of how to calculate the costs of a magazine bleed ad!

EdTech 513: Project #7: Google Slides Presentation

I really enjoyed using Google Slides. It is easy to navigate and can quickly be published and embed into a website or blog for sharing purposes. I did my best to follow the multimedia principles that we have learned throughout this semester when creating the presentation.  If I had more time, I would have found some more pictures to go along with the presentation. I feel like this was a difficult topic to provide relevant graphics other than screen shots. Another thing that I would have done would have been to come up with a full worked example that pertained to my content area. I used customer service in my example of near and far transfer, but I think it would have been cool for me to create my own worked example for a marketing class. Overall, I liked using Google Slides, I just wish it had some of the same features as PowerPoint. Please click below to see my presentation.

Worked Example Google Slides Presentation

EdTech 513: Project #6 Digital Story

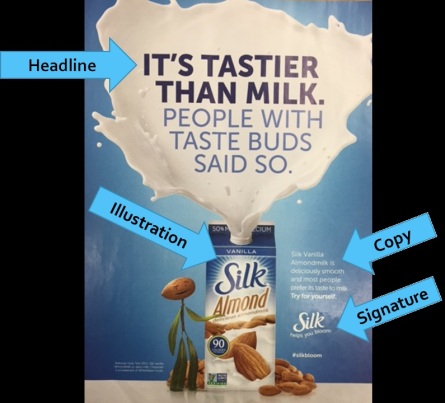
For this assignment, I decided to teach about an advertising concept through a digital story. The story explains the 4 parts of an ad: headline, copy, illustration, and signature. It defines and explains each part, while providing an example for students to better understand. It includes the Personalization Principle because it is presented in a friendly tone with a fun cartoon character that is explaining the concepts and examples. It also explains the material visually.

I used PowToon to create my story. I have seen some really cool videos with this digital storytelling tool so I thought I would give it a try! It was very frustrating in the beginning. I spent a lot of time playing around with all the features before I got the hang of it. The website was running very slow as well so this was another frustration. Eventually I decided to try it in a different browser (Explorer) and it ended up working a lot better.

An obstacle while creating this project was making sure that my voice narration lined up with the text and graphics that I had entering the screen. It is crazy to me that a 2 minute video took me several hours to create. Overall, I liked PowToon, but think they could update a few things such as being able to group text and graphics. It is also kind of overwhelming the amount of feature that the site offers.

The video that I created isn’t perfect, but it was definitely a learning experience. Now that I have the hang of it, I would probably use PowToon in the future, but I think it would be difficult to teach students how to use. The best thing to do is learn by trial and error, even if it took me way longer than it should have! I ended up adding closed captioning to my video which is something that I have never done in YouTube before. It was very easy to do and I am glad that I will be able to CC videos easily in the future.

EdTech 513: Project #5: Coherence Analysis

“According to the Coherence Principle, you should avoid adding any material that does not support the instructional goal” (Clark & Mayer, 2008, pg. 151). It also suggests that e-lessons should avoid the following:

  1. Extraneous audio
  2. Extraneous graphics
  3. Extraneous words

An example of a successful attempt to apply the Coherence Principle would be to simply have a presentation slide with only what is necessary to teach the instructional goal. This could include a graphic and minimal text such as a headline, or labels of the graphic. An example presentation slide of this is shown below. There is no extraneous audio included and only necessary graphics and text are included. By eliminating extraneous audio, graphics, and words, channels will be able to process and apply what is being taught to the overall instructional goal, in this case learning the 4 parts of an advertising layout.

Ad layout

A bad example of applying the Coherence Principle can be found in Figure 8.2 on page 154 in e-Learning and the Science of Instruction. This is a poor example because it displays information about ammunition, while having background sounds with explosions. This audio is not necessary and is most likely distracting, violating the avoiding extraneous audio rule of this principle.

I have definitely seen this principle be violated and have most likely violated it in my own classroom! An example of a violation is when I had students create a PowerPoint project about themselves. When presenting the PowerPoint, a student used sound effects as the text was entering the slide. The sound they used was a typewriter for each word on the screen. Not only was this distracting to the audience and quite annoying, but it also took away from the oral presentation. In correlation with the cognitive theory of multimedia learning, “background sounds can overload or disrupt the cognitive system, so the narration and the extraneous sounds must compete for limited cognitive resources in the auditory channel” (Clark & Mayer, 2008, pg. 156). This would take away from the overall instructional goal of the presentation.

So far in this course, we have learned about the following multimedia principles:

  • Multimedia: Include both words and graphics
  • Contiguity: Place words near corresponding graphics
  • Modality: Present words as speech rather than on-screen text
  • Redundancy: Do not add on-screen text to narrated graphics
  • Coherence: Avoid extraneous audio, text, and words

I believe that all of these principles work well with one another and the main goal is to achieve the instructional objective, while minimizing cognitive overload of channels. Learning about these principles has really made me think about past, current, and future presentations that I create. I know that I have violated some, if not all of these principles and in the future I plan to apply each to make my presentations more effective by minimizing the cognitive load for students.

Fundamental theories of psychology come into play when applying the Coherence Principle. By simplifying to only what is necessary to reach the instructional goal, channels will be able to process information more efficiently, allowing information to be better processed in the working memory.

What I like about this principle is that it supports that simplicity is a good thing. Many times as educators, we try to make these elaborate presentations that would actually be more effective if we followed that “less is sometimes better”. By eliminating extraneous audio, graphics, and words, students won’t experience cognitive overload.

Although the findings of this principle are backed up well by research, I appreciate that this textbook notices that there is still work to be done. There are challenges and unknowns about the Coherence Principle. One challenge in particular is determining if this principle applies to high-knowledge learners. “The challenge for instructional professionals is to stimulate interest without adding extraneous material that distracts from the cognitive objective of the lesson (Clark & Mayer, 2008, pg. 173). Further research would need to be completed in order to determine if there are ways to incorporate words/graphics while supporting the instructional goal and promoting interest. Now that I know about this principle, I plan to not only update my own lessons, but also teach these principles to my students for any presentations that they create.

References:

Clark, R. C. & Mayer, R. E. (2008). E-learning and the science of instruction, 2nd edition. Pfeiffer: San Francisco, CA.

EdTech 513: Project #3: Haiku Deck

I really enjoyed the simplicity and ease of use of Haiku Deck. This site allows you to create PowerPoint-like presentations, but limits your text. My goal was to have as little of text possible on each slide and have the main parts of the presentation be the visuals. Haiku Deck is awesome in that it allows you to search over 40 million images that fit your presentation needs. In addition, if you use the images provided by the site, it cites the photos used for you! How awesome!

For my presentation, I decided to do the basics of the marketing mix, also known as the 4 P’s (product, price, place, and promotion). This concept is the foundation of marketing. When using Haiku Deck, I learned that what I am teaching can easily be expressed in less text and awesome visuals. I love how I was able to keep each slide simple with just a picture and the topic that I was discussing as the title text. The slide notes allow for me to expand on what I would like to teach. This allows for a clean look and delivery of information, without the chaos of an overwhelming slide of text. I think this site would be great for not only teacher presentations, but student presentations as well. Not allowing a lot of text forces users to keep it to only what is absolutely necessary and then expand on each topic as they present. I believe this type of presentation would benefit audience engagement.

I will definitely be looking into using this site again. One disappointment was that you only get a 7 day free trial and then after there is a fee. However, I loved how easy it was to use and how it forced me to simplify my presentation! Click the link below to see my Haiku Deck:

Marketing Mix Haiku Deck

EdTech 513: Project #2: Static Multimedia Instruction

Learning Objectives: After viewing this tutorial, the learner will be able to successfully log in,  access, and save a document to their OneDrive student account.

Students will follow the 8 steps to complete the learning objectives. Please click the document to view the steps and corresponding screen shots.

I absolutely loved using Clarify and I am looking forward to using this tool in the future! I created instructions using screen shots before, but have never used a program that was this easy to use. It has all the tools that I need to screen shot, type steps that go with each picture, draw arrows and add boxes to highlight the part of the picture I am referring to, and so much more! I will be able to create tutorials in half the time it took me in the past. I also passed this tool on to our school’s technology specialist because I was so impressed by its ease of use and features.

The process for creating this tutorial first began by outlining the necessary steps to complete the learning objective. Then, I went through the process myself and took the screen shots along the way. Finally, I added in an additional notes, boxes, and arrows to highlight parts of the pictures that I felt would be beneficial to the learner.

This instructional tutorial demonstrates both the multimedia principle and contiguity principle 1. The multimedia principle recommends that “e-learning courses include words and graphics rather than words alone” (Clark & Mayer, 2008, pg. 70). I definitely agree with this principle as well as contiguity principle 1 that takes it a step further. This principle expresses the “need to coordinate words and graphics” (Clark & Mayer, 2008, pg. 93). In this assignment, this was accomplished by having the instructions in a step by step format right next to the picture of step that it was describing. I believe it is so important for a combination of text and graphics to be used when giving instructions. This gives learners another reference to make sure that they are on the right track. In addition, it saves time by being able to match their screen with the pictures and instructions.

References:

Clark, R. C. & Mayer, R. E. (2008). E-learning and the science of instruction. San Francisco, CA: Pfeiffer.

EdTech 513: Project #1: Sketchnote

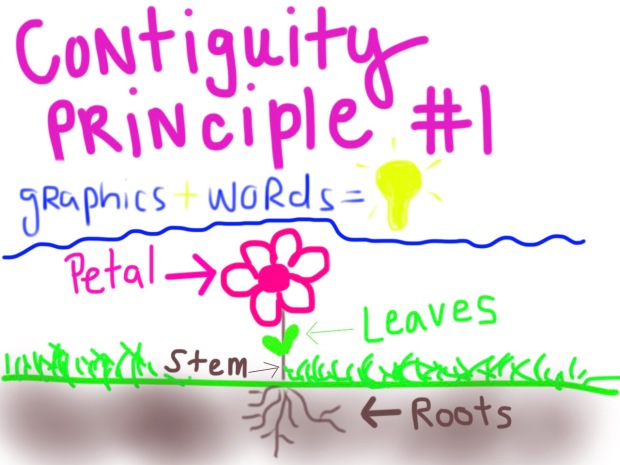
For this week’s assignment, we were to read Ch. 4 and 5 in e-Learning and the Science of Instruction and create a Sketchnote on one of the given topics. I chose to create my Sketchnote on Contiguity Principle #1 which “involves the need to coordinate printed words and graphics” (Clark & Mayer, 2008, pg. 93). I downloaded the app SketchBook, and began by playing around with it and exploring all of its features. After I felt more comfortable with the tools and features, I brainstormed how I would explain the principle through a Sketchnote.

First, I wrote the name of the principle. Then I added in a description of what it entails by writing words + graphics = and then I drew a picture of a light bulb to symbolize learning. For my example of the principle, I drew a simple picture of a flower. I used different colors for each part of the flower and then labeled each part by writing the name of the part and drawing arrows with corresponding colors. The Sketchnote is displayed below.

image1

I really enjoyed working with SketchBook and exploring all of its features. It was a little difficult to get used to and I went back and forth from using a stylus and my finger. Tools that I used included pencil, pen, marker, spray painter, shape/line, text,  and the eraser. I was easily able to change the thickness and color of the tools that I was using. Challenges that I faced were getting it to look EXACTLY how I wanted it to. Although this was not necessary, having the option to quickly undo what I had drawn became a bad habit. It took me MUCH longer than it should have because I overused this button. If I were just drawing this Sketchnote out, I think it would have been interesting because there would have been little room for error and I wouldn’t have had the undo option. Another challenge that I faced was that I originally used the text tool to write the words. This created new layers in the project. I soon realized that with the free version, you are only allowed three layers. I had more words than I had layers so I had to go back and write them myself.

I learned that using Sketchnote apps such as SketchBook to promote visual learning would be great in the classroom. Currently, I try to have students create pictures that help them understand words and definitions as much as I can. I am a strong believer that this process helps them better understand marketing concepts. I think that even if you cannot create the “best” images, whatever you create will still help you learn the material better. The extra time spent adding graphics to represent words will deepen the knowledge learned and will benefit students long-term. I am looking forward to using the Sketchnote technique in my classroom!

References:

Clark, R. C. & Mayer, R. E. (2008). E-learning and the science of instruction. San Francisco, CA: Pfeiffer.